KV260 视觉 AI 套件入门--示例演示(Resnet50)
目录
1. 简介
本文以 Resnet50 为例,展示使用 PYNQ 调用 DPU 运行 Resnet50 简单入门演示。
PYNQ
是一个针对 Xilinx Zynq 平台的 Python 开发框架,它允许开发者使用Python语言和库来利用 Zynq的高效计算资源,使用 PYNQ 可以非常方便地处理各种与 Zynq 相关的计算任务,包括调用 DPU 进行推理。
Resnet50
一种深度卷积神经网络(CNN),它由50层构成。这种网络特别设计用于图像识别任务,并且在2015年的ImageNet大规模视觉识别挑战赛(ILSVRC)中取得了胜利。Resnet50的“残差学习”能力使得它可以通过添加更多的层来提高准确性,而不会导致训练难度增加或准确性下降。
这个网络的核心是“残差块”,它允许数据在网络的多个层之间直接传递,从而解决了深度网络训练中的“退化问题”。这种设计使得即使是非常深的网络也能有效地训练,并且随着网络深度的增加,性能也能得到提升。
2. 代码解析
- 硬件和模型加载
overlay = DpuOverlay("dpu.bit")
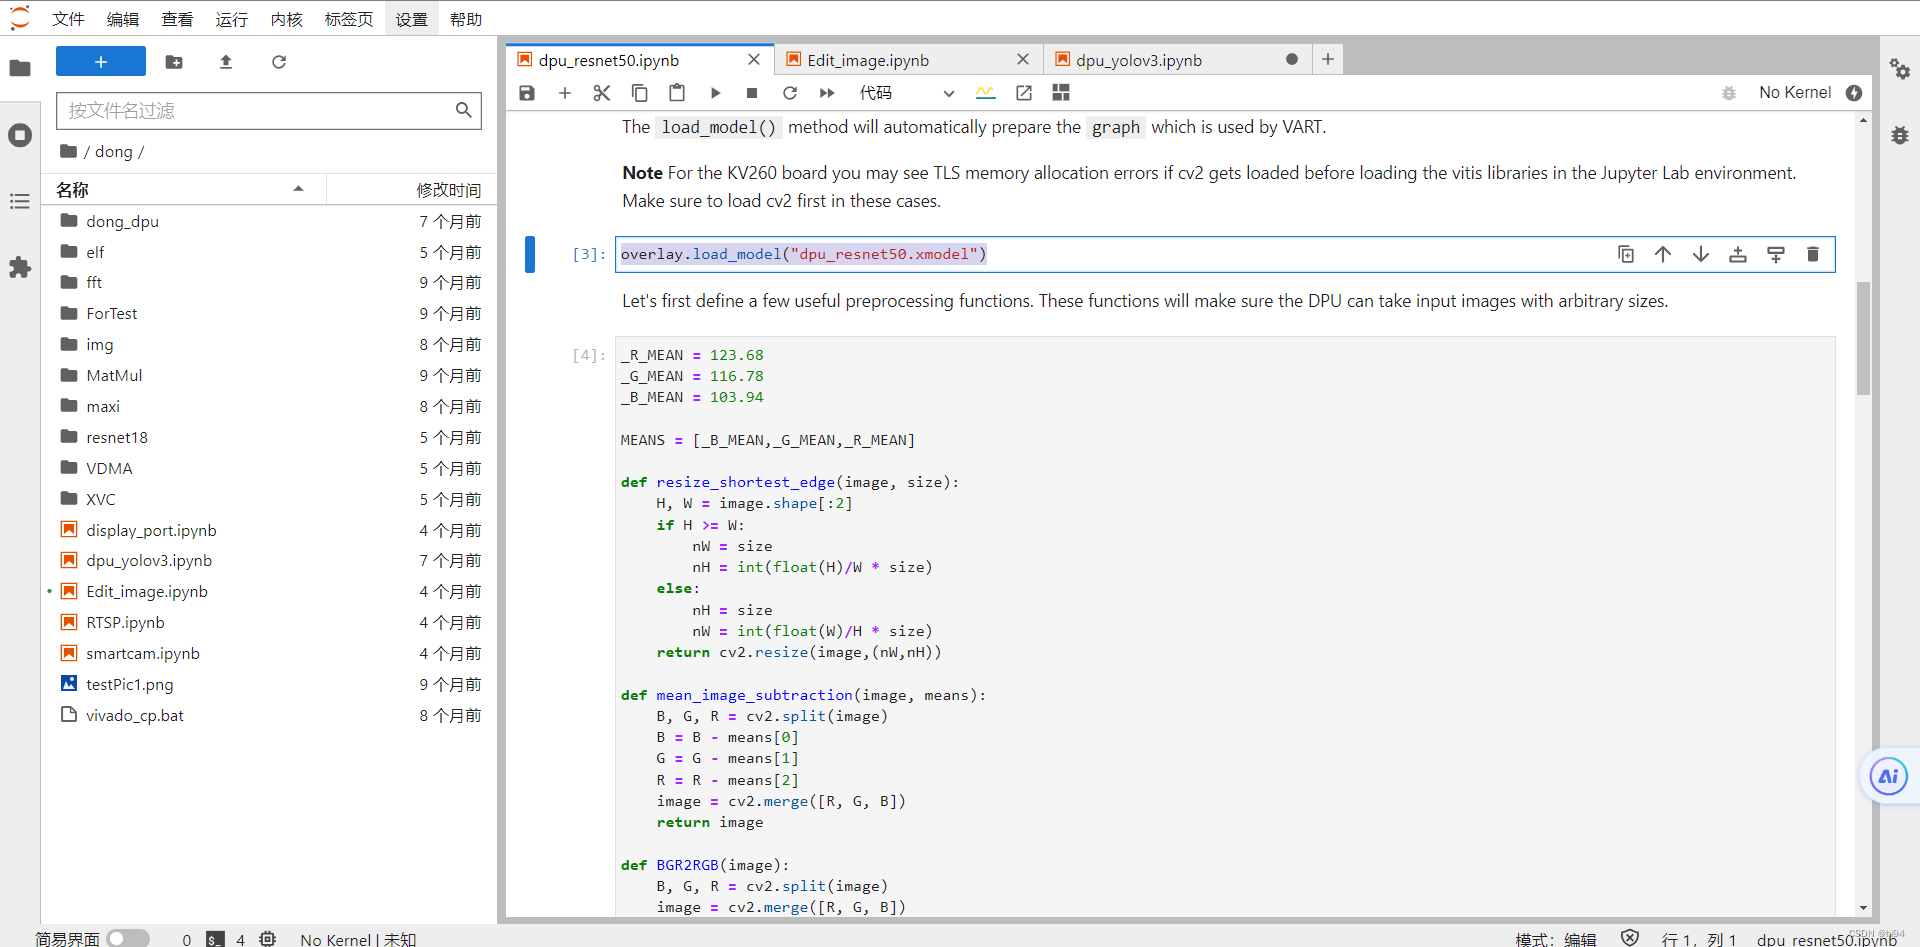
overlay.load_model("dpu_resnet50.xmodel")
首先,加载一个名为 dpu.bit 的 FPGA 比特流到 Zynq 设备上。DpuOverlay 是 PYNQ 库中用于管理 FPGA 上的叠加层(overlay)的一个类。
然后加载一个名为 dpu_resnet50.xmodel 的深度学习模型到已经配置好的 DPU 上。load_model 是 DpuOverlay 类的一个方法,它用于加载编译后的深度学习模型文件。这里的 dpu_resnet50.xmodel 是一个已经被转换和优化以适应 DPU执行的深度学习模型文件。
- runner类,来自VART的方法
dpu = overlay.runner # runner类,来自VART的方法
inputTensors = dpu.get_input_tensors() # 返回是单个元素的列表
outputTensors = dpu.get_output_tensors() # 即[xir.Tensor]
VART(Vitis AI Runtime)是Xilinx提供的一套运行时库,用于在Xilinx平台上执行深度学习模型推理。
dpu = overlay.runner,这行代码通过访问overlay对象的runner属性,获取了一个VART运行时的实例。
- 获取dimensions
# 元组tuple,类似于列表list,但不可更改;dims -> dimensions
shapeIn = tuple(inputTensors[0].dims) # 元组(1, 224, 224, 3)
shapeOut = tuple(outputTensors[0].dims) # (1, 1, 1, 1000)- 计算输出数据大小
# get_data_size()方法返回输出张量的总大小,除以输入张量的第一维大小(即batch size),可以得到单个输出张量的大小。outputSize为1000
outputSize = int(outputTensors[0].get_data_size() / shapeIn[0])- 构建一维阵列,dtype=f64
softmax = np.empty(outputSize)- 形状shape创建内存数据阵列;order="C"行优先存储,"F"列优先存储
output_data = [np.empty(shapeOut, dtype=np.float32, order="C")]
input_data = [np.empty(shapeIn, dtype=np.float32, order="C")]- 为 input_data 中第一个元素设置别名 image
image = input_data[0]- 图像预处理
preprocessed = preprocess_fn(cv2.imread(os.path.join(image_folder, original_images[image_index])))- 格式转换,切片操作
image[0,...] = preprocessed.reshape(shapeIn[1:])- 执行异步推理作业,并等待结果返回
job_id = dpu.execute_async(input_data, output_data)
dpu.wait(job_id)
job_id = dpu.execute_async(input_data, output_data),这行代码调用execute_async方法来异步启动一个深度学习模型的推理任务。这个方法接收两个参数:input_data和output_data,分别代表模型的输入数据和用于接收模型输出结果的容器。input_data应该与模型的输入张量格式匹配,而output_data则应该是足够大以容纳预期的输出结果的容器。
execute_async方法立即返回一个job_id,这是一个标识符,用于追踪异步执行的推理任务。此时,推理任务已经在DPU上启动,但该方法不会阻塞调用线程等待任务完成。这允许CPU继续执行其他任务,而不必等待DPU完成推理。
dpu.wait(job_id),这行代码调用wait方法,并传入之前execute_async方法返回的job_id,以等待对应的推理任务完成。如果推理任务已经完成,wait方法将立即返回;如果推理任务尚未完成,wait方法将阻塞调用线程,直到任务完成。这确保了在继续进行任何依赖于推理结果的操作之前,推理任务已经成功完成。
- 转化为一维向量
# 转化为一维向量,放入temp列表中,此时temp形状为(1,1,1000)
temp = [j.reshape(1, outputSize) for j in output_data]- 计算每个元素的指数
softmax = calculate_softmax(temp[0][0])- 计算最大值所在的index标签
print("Classification: {}".format(predict_label(softmax)))- 显示图像
if display:
  display_image = cv2.imread(os.path.join(image_folder, original_images[image_index]))
  _, ax = plt.subplots(1)
  _ = ax.imshow(cv2.cvtColor(display_image, cv2.COLOR_BGR2RGB))
_ = ax.imshow(cv2.cvtColor(display_image, cv2.COLOR_BGR2RGB))
# 短横线"_"用作一个变量名,临时变量,一种书写习惯
3. 全部代码展示
以下代码演示了使用PYNQ和DPU进行深度学习推理的全部过程,从图像预处理、数据加载、模型推理到结果展示,为图像分类任务提供了一个完整的流程:
import os
import time
import numpy as np
import cv2
import matplotlib.pyplot as plt
%matplotlib inline

from pynq_dpu import DpuOverlay
overlay = DpuOverlay("dpu.bit")

overlay.load_model("dpu_resnet50.xmodel")

_R_MEAN = 123.68
_G_MEAN = 116.78
_B_MEAN = 103.94

MEANS = [_B_MEAN,_G_MEAN,_R_MEAN]

def resize_shortest_edge(image, size):
    H, W = image.shape[:2]
    if H >= W:
        nW = size
        nH = int(float(H)/W * size)
    else:
        nH = size
        nW = int(float(W)/H * size)
    return cv2.resize(image,(nW,nH))

def mean_image_subtraction(image, means):
    B, G, R = cv2.split(image)
    B = B - means[0]
    G = G - means[1]
    R = R - means[2]
    image = cv2.merge([R, G, B])
    return image

def BGR2RGB(image):
    B, G, R = cv2.split(image)
    image = cv2.merge([R, G, B])
    return image

def central_crop(image, crop_height, crop_width):
    image_height = image.shape[0]
    image_width = image.shape[1]
    offset_height = (image_height - crop_height) // 2
    offset_width = (image_width - crop_width) // 2
    return image[offset_height:offset_height + crop_height, offset_width:
                 offset_width + crop_width, :]

def normalize(image):
    image=image/256.0
    image=image-0.5
    image=image*2
    return image

def preprocess_fn(image, crop_height = 224, crop_width = 224):
    image = resize_shortest_edge(image, 256)
    image = mean_image_subtraction(image, MEANS)
    image = central_crop(image, crop_height, crop_width)
    return image

def calculate_softmax(data):
    result = np.exp(data)
    return result

def predict_label(softmax):
    with open("img/words.txt", "r") as f:
        lines = f.readlines()
    return lines[np.argmax(softmax)-1]

image_folder = 'img'
original_images = [i for i in os.listdir(image_folder) if i.endswith("JPEG")]
total_images = len(original_images)

dpu = overlay.runner

inputTensors = dpu.get_input_tensors()
outputTensors = dpu.get_output_tensors()

shapeIn = tuple(inputTensors[0].dims)
shapeOut = tuple(outputTensors[0].dims)
outputSize = int(outputTensors[0].get_data_size() / shapeIn[0])

softmax = np.empty(outputSize)

output_data = [np.empty(shapeOut, dtype=np.float32, order="C")]
input_data = [np.empty(shapeIn, dtype=np.float32, order="C")]
image = input_data[0]

def run(image_index, display=False):
    preprocessed = preprocess_fn(cv2.imread(
        os.path.join(image_folder, original_images[image_index])))
    image[0,...] = preprocessed.reshape(shapeIn[1:])
    job_id = dpu.execute_async(input_data, output_data)
    dpu.wait(job_id)
    temp = [j.reshape(1, outputSize) for j in output_data]
    softmax = calculate_softmax(temp[0][0])
    if display:
        display_image = cv2.imread(os.path.join(
            image_folder, original_images[image_index]))
        _, ax = plt.subplots(1)
        _ = ax.imshow(cv2.cvtColor(display_image, cv2.COLOR_BGR2RGB))
        print("Classification: {}".format(predict_label(softmax)))

run(1, display=True)
代码的主要步骤如下:
- 环境配置与模型加载:首先,导入所需的Python库,包括os、time、numpy、cv2(OpenCV库)、matplotlib(用于图像显示)等,并加载DPU叠加层和预训练的深度学习模型(dpu_resnet50.xmodel)。
- 图像预处理:定义了几个预处理函数来准备图像数据以供模型使用。这些函数包括:
- resize_shortest_edge:调整图像大小,使得其最短边为指定的尺寸,同时保持原始的宽高比。
- mean_image_subtraction:执行均值减法,用于图像归一化,减去图像中每个通道的平均值。
- BGR2RGB:将图像从BGR格式转换为RGB格式,因为OpenCV默认读入图像为BGR格式,而大多数模型使用RGB。
- central_crop:从图像中心裁剪指定大小的区域。
- normalize:将图像数据归一化到[-1, 1]的范围内。
- preprocess_fn:将上述预处理步骤组合起来,为模型准备图像数据。
- 模型预测:图像预处理后,使用DPU执行预测。首先,读取输入和输出张量的形状,准备好输入数据的容器。然后,对指定的图像进行预处理并将其加载到输入数据容器中。通过DPU执行异步推理,并等待结果。使用calculate_softmax函数计算输出数据的softmax,以获得每个类别的预测概率。
- 结果展示:定义predict_label函数,它根据softmax预测结果,从一个包含类别标签的文件中选择并返回最可能的类别标签。如果display参数设为True,该函数还会显示原图像及其预测类别。
- 执行预测:最后,选择一个图像文件并调用run函数来执行上述预测流程,并可选择是否显示图像及其分类标签。
4. 总结
在这个总结中,我们探讨了Resnet50,这是一个由50层构成的深度卷积神经网络,它在图像识别任务中表现出色。通过“残差学习”的创新设计,Resnet50解决了深度网络训练中的退化问题,使得网络能够通过增加更多的层来提高性能,而不会增加训练难度。我们还分析了如何在Xilinx Zynq平台上使用VART运行Resnet50模型的代码,包括模型加载、数据预处理、异步推理和结果分类。这个过程展示了如何利用Zynq芯片的强大功能,将深度学习应用于边缘计算,为各种行业,特别是高级驾驶辅助系统(ADAS)等应用,提供了新的可能性。这个例子不仅展示了深度学习在实际应用中的潜力,也突显了Zynq芯片在处理复杂计算任务时的高效性和灵活性。

海思 HiSpark 开发者社区是上海海思为开发者搭建的内容和交流平台,依托完备芯片解决方案、专业开发环境、开源/开放的软件资源与社区技术内容,构建完整服务生态开发者的闭环体系。
更多推荐

 15
15 0
0- 0


 已为社区贡献3条内容

所有评论(0)